Most traders stare at charts covered in horizontal lines. They draw support where a wick touched a price three weeks ago, and resistance where price rejected a round number yesterday. The problem? Those lines are just shadows on a screen. They tell you where price was, but they don’t tell you who was trading there or why it mattered.
If you want to trade like the institutions—the banks, funds, and market makers who move price—you need to stop guessing and start looking at the data they leave behind. That data is Volume Profile.
Unlike traditional indicators that simply plot volume over time (like a volume bar at the bottom of the chart), Volume Profile plots volume by price. It answers the most critical question in trading: “At what price levels are the most shares or contracts being exchanged?”
In this guide, you will learn a simple 3-step framework to decode Volume Profile. We will also cover the optimal settings for different timeframes (Weekly vs. Daily) and dive into advanced strategies used by institutional traders. By the end, you will be able to identify where the “smart money” has placed its bets and where the next explosive breakout might occur.
Why Most Support and Resistance Lines Fail#
Before we dive into the solution, we have to acknowledge the problem with traditional technical analysis.
Standard support and resistance is often subjective. One trader draws a line connecting lows from two months ago; another draws a Fibonacci level. While these methods have their place, they lack weight. They don’t tell you how much money is committed to that level.
When price approaches a “standard” resistance line, you have no idea if it will slice through like butter or reverse sharply. You are essentially guessing that history will repeat simply because a line exists.
Institutions do not care about your trendline. They care about liquidity and execution. They need to buy or sell massive amounts of volume without moving the price against themselves. To do this, they cluster their activity at specific prices. Volume Profile visualizes these clusters.
What is Volume Profile? The Institutional Fingerprint#
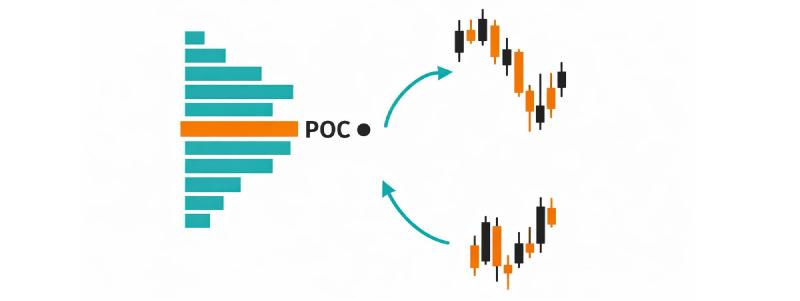
Imagine you are looking at a histogram turned on its side, running vertically up the y-axis (price) of your chart. That is Volume Profile. Each bar represents the total volume traded at that specific price level over a given period.
There are three core concepts you need to understand immediately:
- Volume by Price: The horizontal histogram showing volume at specific prices.
- Point of Control (POC): The price level with the highest traded volume. This is the “fair value” where most transactions occurred.
- Value Area (VA): The price region where a specified percentage (usually 70%) of all volume was traded. This represents the area of “fair value” for the session.
By analyzing where the volume is highest, we can identify levels where institutions have placed large bets. These levels act as magnets, support, and resistance in the future.
The 3-Step Framework to Master Volume Profile#
To move from a novice to a Volume Profile master, you need a systematic approach. Follow these three steps every time you analyze a chart.
Step 1: Identify the Point of Control (POC)#
The Point of Control is the single most important line on your Volume Profile chart. It is the price level where the most trading activity occurred.
Why is the POC so powerful? Because it represents the price where buyers and sellers agreed on value the most. It is the line in the sand.
- As Support/Resistance: In an uptrend, price often pulls back to the POC and bounces. In a downtrend, price rallies to the POC and rejects. It acts as a gravitational center.
- As a Magnet: If price drifts too far away from the POC, it is statistically likely to revert back to it. This is often called “POC reversion.”
How to use it: Look for the highest peak on the volume histogram to the left of your chart. Draw a horizontal line across that price.
- If price is above the POC, the market is in premium (potentially overbought).
- If price is below the POC, the market is in discount (potentially oversold).
When price returns to the POC, be ready for a reaction. If it holds, it confirms the institutional bid/ask. If it slices through easily, it signals a major shift in control.
Step 2: Define the Value Area#
The Point of Control is a single line, but the market doesn’t trade on a single price all day. It trades within a range. The Value Area is that range. It consists of the Value Area High (VAH) and Value Area Low (VAL).
Statistically, 70% of all volume was traded between the VAH and the VAL. This means that the market deemed this range to be “fair value.”
Why the Value Area is a game-changer:
- Mean Reversion Opportunities: When price leaves the Value Area (e.g., spikes above VAH), it is in “poor” or “expensive” territory. Aggressive traders look to fade that move back into the Value Area.
- Breakout Confirmation: A true breakout is not just price closing above resistance; it is price accepting outside the Value Area. If price moves above the VAH and then quickly falls back inside, it is a “failed breakout” or a “spring.”
- Trading the Extremes: The VAH and VAL act as dynamic support and resistance. Think of the Value Area as a thick rubber band. If price stretches away from it, the band usually snaps it back.
Trading Tip: In a strong trend, price will “ride” the edge of the Value Area. In an uptrend, price may consistently find support at the VAH (the top of the value area) and push higher, refusing to re-enter fair value.
Step 3: Analyze High Volume Nodes and Low Volume Nodes#
Now we look at the shape of the profile itself. Not all volume clusters are created equal. We categorize them into High Volume Nodes (HVN) and Low Volume Nodes (LVN) .
High Volume Nodes (HVN) - Institutional Support/Resistance#
An HVN appears as a fat, protruding “belly” on the volume histogram. It represents a price level where a significant amount of trading occurred.
- Role: HVNs act as support and resistance. Because so many transactions occurred here, there are resting orders, trapped traders, and break-even levels clustered here.
- Expectation: When price returns to an old HVN, expect a reaction. Institutions defend their positions. If price breaks through an HVN with high momentum, it is a significant event (often a stop-run).
Low Volume Nodes (LVN) - The Breakout Zones#
An LVN appears as a “gap” or a “waist” in the profile. It is a price level where very little trading occurred. It looks like a skinny part of the histogram.
- Role: LVNs act as magnet zones for price discovery. Price moves through LVNs very quickly because there is no volume (liquidity) to stop it. There are no institutional orders sitting here.
- Expectation: Price will race through an LVN. If you see price approaching a large LVN, expect a fast move. These are prime locations for breakouts and breakdowns.
- If price has been trading in a range and suddenly breaks into an LVN, it is often the start of a strong trend.
Optimal Volume Profile Lookback Period (Weekly vs. Daily)#
The Lookback Period determines how far back the indicator calculates volume. This must change based on your timeframe.
| Timeframe | Trading Style | Recommended Lookback | Logic |
|---|---|---|---|
| Weekly Chart | Long-Term Investing / Position Trading | 52 | 52 weeks = 1 year of data. This shows you the major accumulation zones for the year without old, irrelevant data. |
| Daily Chart | Swing Trading (Hold days/weeks) | 50 - 100 | 100 days gives you a great view of the last 3 months of trading. This is the sweet spot for swing traders. |
| 4-Hour / 1-Hour | Day Trading | 50 - 100 | Keeps the data recent enough to be relevant for the current session. |
Pro Tip: If you are a swing trader, analyze the Weekly chart with a lookback of 52 to determine the overall trend and major support/resistance. Then, drop down to the Daily chart with a lookback of 100 to fine-tune your entry.
Advanced Volume Profile Trading Strategies#
Here are three powerful strategies that go beyond the basics, incorporating the timeframe settings discussed above.
Strategy 1: The “Weekly POC Bounce” (High Probability Swing Trade)#
This is the cornerstone of institutional swing trading. Instead of guessing where Bitcoin might reverse, we let the Weekly Point of Control act as our guide. This strategy uses the Weekly chart to identify the “fair value” zone where institutions have placed their largest bets, and then uses the Daily chart to time the perfect entry.
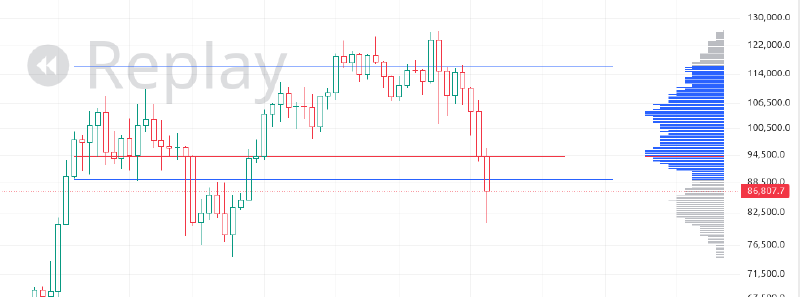
Step 1: Weekly Analysis – Find the Institutional Magnet#
Start on the Weekly timeframe. Set your Volume Profile lookback to 52. This gives you a full year of trading data, filtering out noise and highlighting the most significant price level where Bitcoin changed hands the most.
Identify the highest peak on the Volume Profile histogram. This is the Point of Control (POC) . On the weekly chart, this line acts as a massive gravitational force.
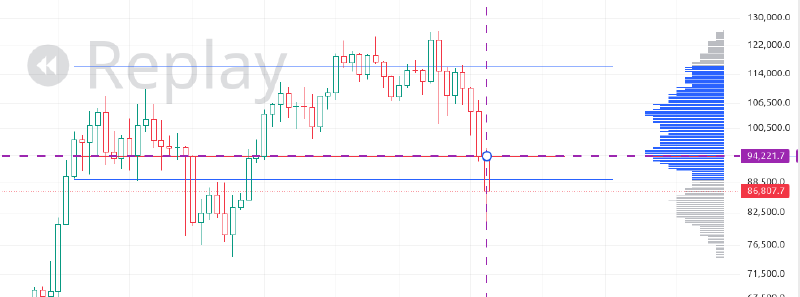
Step 2: Daily Pullback – Wait for Price to Come to You#
Patience is key. Now, move down to the Daily timeframe. You are waiting for the price of Bitcoin to travel back to the Weekly POC zone identified in Step 1.
Do not chase price. Let the market come to the level. Once price arrives, zoom in. You are looking for the Daily chart to confirm the zone by showing signs of rejection.
- In a long scenario (price below POC moving up): Look for bullish reversal candlesticks like hammers or engulfing patterns.
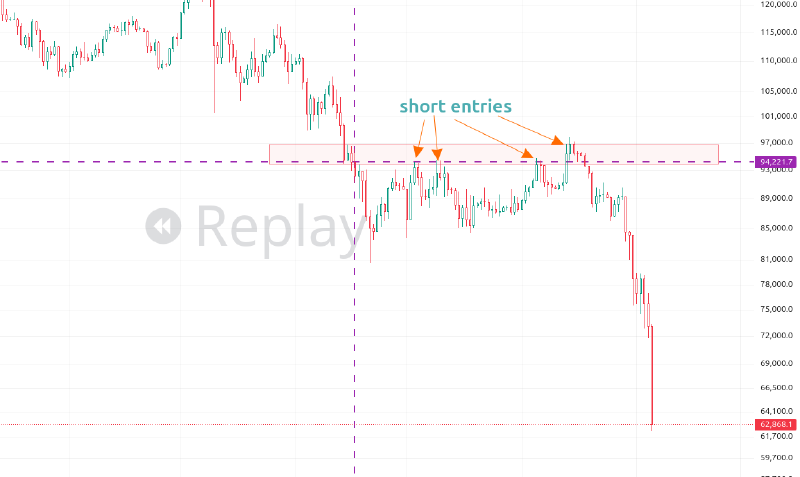
- In a short scenario (price above POC moving down): Look for bearish reversal candlesticks like shooting stars, bearish engulfing, or simply a rejection wick to the downside.
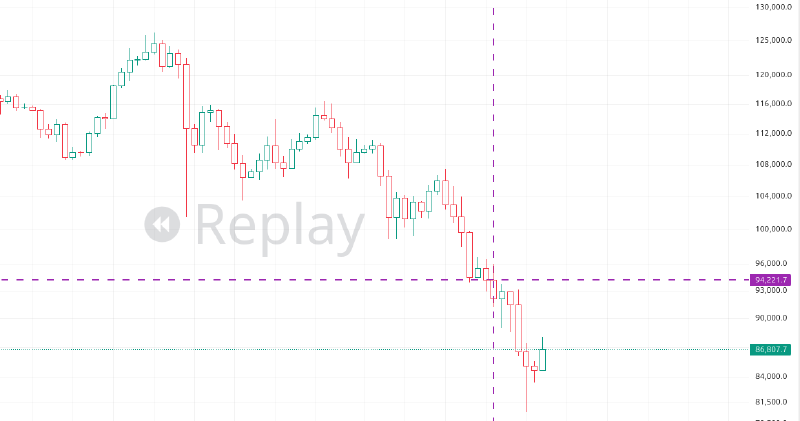
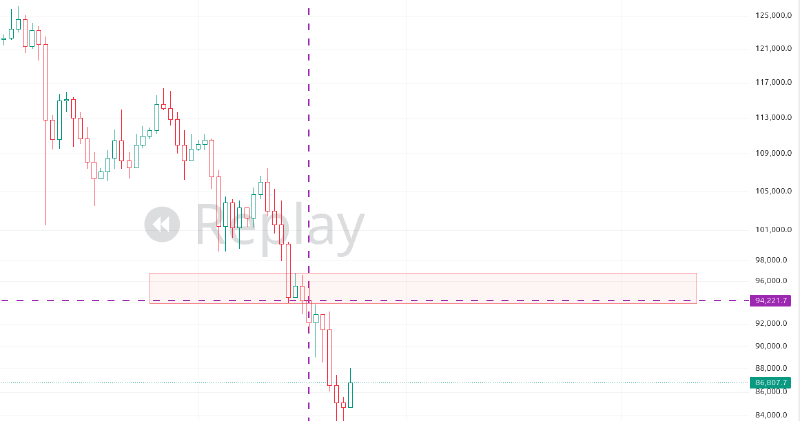
Step 3: The Trade – Execute at the Zone#
Once price interacts with the Weekly POC zone on the Daily chart, look for confirmation.
- For long positions: A bullish bounce off the zone.
- For short positions: A bearish rejection from the zone (as shown in chart).
Enter the trade in the direction of the rejection.
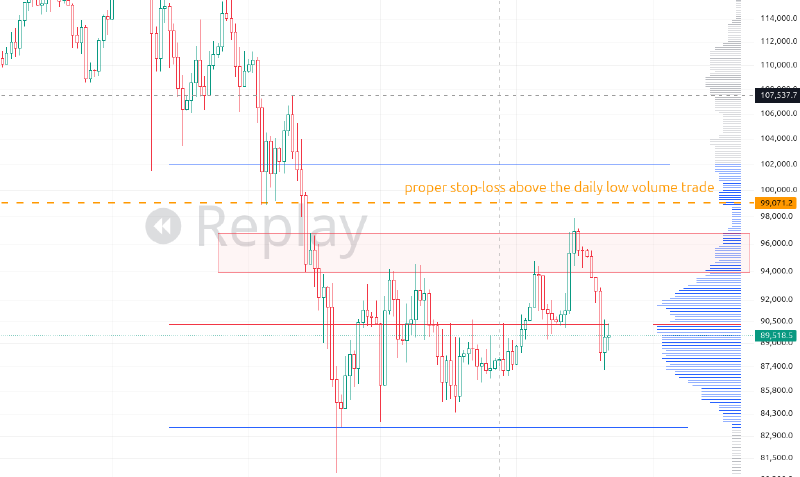
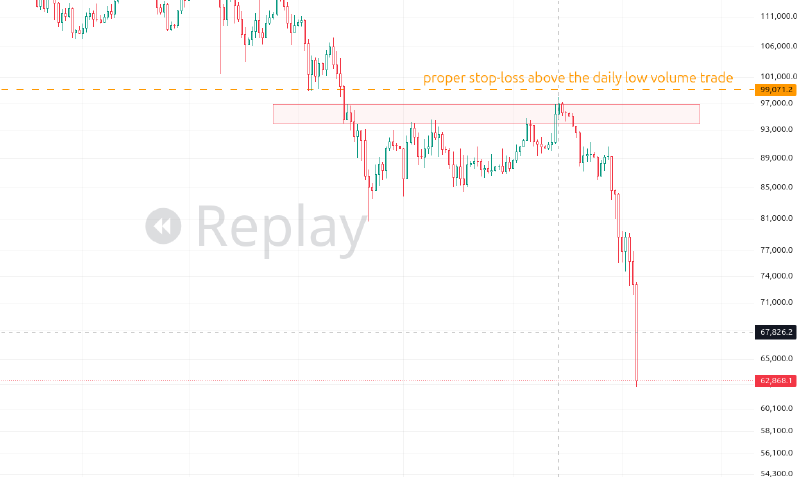
Step 4: Stop Loss – Protect Your Capital#
Smart risk management separates professionals from amateurs. Place your stop-loss just beyond a logical area of low volume.
Look at the Daily Volume Profile. Identify a Low Volume Node (LVN) or a recent swing low below the entry zone. Placing your stop here ensures that if the institutional level fails and price drops into “no-trade” territory, you are out with a small, controlled loss.
Step 5: Take Profit – Ride the Wave Back to Value#
Define your target based on the next logical area of high volume or structure. Often, the first target is the Point of Control of the current Daily session or the opposite end of the Value Area High (VAH).
You are betting on a “mean reversion” back into fair value, so look for the nearest High Volume Node (HVN) as your profit zone.
Why This Strategy Works Every Time#
You are not trading random lines on a chart. You are aligning your trade with the “fair value” determined by an entire year of trading activity (the Weekly POC). By executing on the Daily chart, you are using a higher timeframe for direction and a lower timeframe for precision. This is how institutions think: High timeframes for bias, low timeframes for entry.
Strategy 2: The “LVN Gap Fill” (Breakout Momentum)#
Low Volume Nodes act as vacuums. Price tends to rush through them. This strategy helps you catch that momentum.
- Step 1 (Identify the Gap): Look for a clear “waist” or “gap” in the Volume Profile where the histogram is very thin (an LVN). This works on any timeframe but is best on the 1-hour or 4-hour chart.
- Step 2 (Approach): Wait for price to approach the edge of the LVN from below or above.
- Step 3 (The Entry): As price touches the edge of the LVN, enter in the direction of the move. Do not wait for a reversal; you are trading the lack of resistance.
- Stop Loss: Place it just inside the LVN (if price reverses and sticks inside the gap, the thesis is wrong).
- Take Profit: Target the next significant HVN on the other side of the LVN.
Why it works: There are no resting orders inside an LVN. Price can “free fall” or “rocket” through these zones with minimal opposition.
Strategy 3: The “Value Area High/Low Bounce” (Range Trading)#
This is a classic mean-reversion strategy perfect for ranging markets.
- Step 1 (Identify the Range): On your chosen timeframe (e.g., 1-hour chart with lookback 50), identify a market that is respecting the VAH and VAL clearly, bouncing between them.
- Step 2 (The Fade):
- When price reaches the VAH, look for bearish confirmation to go short.
- When price reaches the VAL, look for bullish confirmation to go long.
- Step 3 (The Exit): Your target is the Point of Control (POC) in the middle of the range. This is the “fair value” magnet.
- Stop Loss: Place your stop just outside the VAH or VAL.
Why it works: You are buying low (VAL) and selling high (VAH) within the area of fair value, betting that the market will continue to respect the 70% trading range.
Common Mistakes to Avoid#
Even with a powerful tool like Volume Profile, it is easy to misuse it. Avoid these pitfalls:
- Using the Wrong Lookback: Don’t use a lookback of 100 on a Weekly chart if you are swing trading (use 52). Don’t use a lookback of 20 on a Daily chart (use 100). Match the lookback to your goal.
- Looking at Only One Session: The most powerful support and resistance often come from the High Volume Nodes of previous days or weeks. Don’t just look at today’s profile; overlay the previous day’s POC and VAH. These often align perfectly with key reactions.
- Ignoring Market Structure: Volume Profile is not an island. Combine it with trend lines, chart patterns, or moving averages. If the POC aligns with a Fibonacci retracement level and a previous structure low, you have a “confluence zone”—a very high-probability trade.
- Assuming it Works Forever: Markets change character. A stock or future might shift from a balanced, two-way market (good for range trading with Profile) to a runaway trend (where profile levels get blown through). Always adapt.
Conclusion: Trade What You See, Not What You Think#
Traditional technical analysis often asks you to imagine where support should be. Volume Profile allows you to see where support actually is based on the hard data of traded volume.
By mastering this 3-Step Framework and applying the correct settings for your timeframe, you stop trading based on hope and start trading based on the footprints of the institutions:
- Identify the POC to find the market’s center of gravity.
- Define the Value Area to know what price is considered “fair.”
- Analyze HVN/LVN to spot where price will stick (support/resistance) and where it will fly (breakouts).
Start practicing this today. Open your charting platform, set your lookback to 52 on the Weekly or 100 on the Daily, enable the Volume Profile, and mark the POC, VAH, and VAL. Watch how price reacts to these invisible lines of control.
When you align your trades with institutional volume, you align yourself with the path of least resistance.
Disclaimer: This article is for educational purposes only and does not constitute financial advice. Trading involves risk. Always conduct your own research before making investment decisions.